How to Create the Perfect Gallery Wall
A step-by-step guide to planning, curating, and hanging a gallery wall that looks intentional, not chaotic. From layout to frame selection to the designs that actually work together.
A gallery wall done well is one of the most impactful things you can do to a room. Done poorly, it looks like you ran out of wall space and started hammering nails at random. The difference between the two isn't talent; it's knowing the rules well enough to apply them deliberately.
This guide walks you through every decision: how to choose a layout, how to mix print styles without creating chaos, which common mistakes to avoid, and how to hang everything so it actually stays level.
What Is the Rule for Gallery Walls?
The most widely cited rule is the 57-inch rule: the visual center of any grouping, or any single piece, should sit at 57 inches from the floor. That's average human eye level, and it's the standard used by most professional galleries and museums.
For a gallery wall, you apply this to the center of the entire arrangement, not each individual piece. Measure your grouping, find its midpoint, and anchor that midpoint at 57 inches. Everything radiates out from there.
The second rule worth knowing: maintain consistent spacing. Pick a gap, typically 2 to 3 inches, and hold it between every frame. Consistent spacing is what makes a varied arrangement feel curated rather than cluttered. It's a small thing that makes an enormous visual difference.
Choosing a Layout: Grid vs. Salon Style
The two dominant approaches to gallery wall layouts serve completely different aesthetics. Choosing the right one for your space is the first real decision.
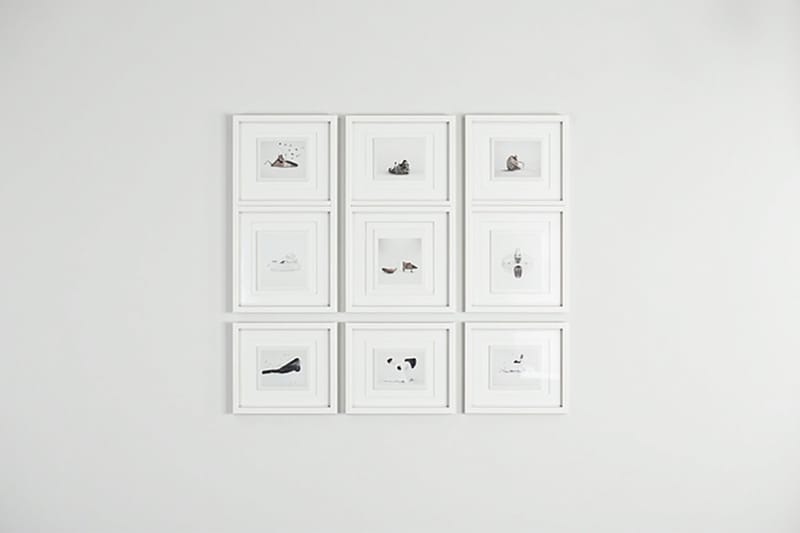
The Grid Layout
A grid uses uniform frame sizes, consistent spacing, and a symmetrical arrangement, typically 2×2, 3×3, or a horizontal row. It reads as precise and architectural. It works best in:
- Hallways and narrow walls where there's limited horizontal real estate
- Modern, minimal interiors where visual noise needs to stay controlled
- Spaces with strong existing geometry: tiled floors, grid windows, structured furniture
The limitation of a grid is that it demands precision. Every frame needs to be level, every gap needs to match. If your walls aren't perfectly plumb, a grid will expose that.
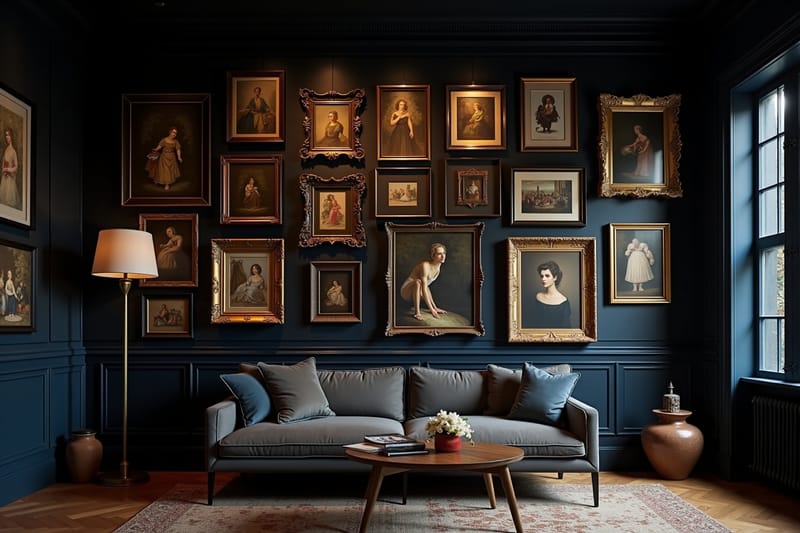
The Salon Wall
Salon hanging is the opposite philosophy: frames of different sizes, mixed orientations, arranged by feel rather than formula. It traces back to 17th-century Paris, where paintings were hung edge-to-edge from floor to ceiling to display as many works as possible.
Today's salon walls are more curated. You're not trying to show everything, you're building a composition. The guiding principle: start with your largest piece and build outward. Place it slightly left of center at eye level. Fill in around it, keeping the overall silhouette roughly rectangular.
Salon walls work best in:
- Living rooms and dining rooms where you want warmth and depth
- Spaces with high ceilings, where salon hanging draws the eye upward
- Eclectic, maximalist, or collected interiors where variety reads as character
What Is the Best Layout for a Gallery Wall?
There is no single best layout, but there is a best layout for your space. Here's how to decide:
| If your wall is... | Choose... |
|---|---|
| Narrow (under 5 feet wide) | Grid or single vertical column |
| Wide and low-ceilinged | Horizontal row or asymmetric horizontal cluster |
| Large and open | Salon-style arrangement anchored by a hero piece |
| Above furniture (sofa, console) | Stay within the furniture's width; center the grouping over the piece |
One more consideration: the relationship between the wall and the furniture below it. A gallery wall above a sofa should be roughly two-thirds the sofa's width. Any wider and it feels unmoored; any narrower and it looks like an afterthought.
Curating Prints That Work Together
This is where most gallery walls go wrong. People either pick pieces that are too similar (the wall reads as monotonous) or too different (it reads as incoherent). The goal is controlled variety.
A reliable formula: one anchor, one complement, one contrast.
- The anchor is your largest or most visually dominant piece. It sets the mood.
- The complement echoes the anchor's palette or subject matter in a quieter register.
- The contrast introduces tension: a different style, weight, or texture that keeps the eye moving.
Here's that formula applied with three very different Wallerz prints:
The Minimalist Anchor
A clean, high-contrast silhouette reads as grounded and architectural. It holds the eye without demanding too much. This is the piece the rest of the wall orbits.
The Bold Statement
Once you have your anchor, you need something with more energy, a piece that creates visual tension. A vintage-inspired portrait with deep contrast and a painterly quality does exactly that.
The Impressionist Layer
The third piece softens the arrangement and introduces color and texture. An impressionist-style print brings warmth without chaos. It's complex enough to be interesting, but loose enough not to compete with the other two.
These three prints, one architectural minimalist, one dramatic portrait, one impressionist landscape, span style and subject matter while staying in the same tonal range. That's what makes a gallery wall feel collected rather than random.
What Are Common Gallery Wall Mistakes?
Hanging Too High
This is the single most common mistake in residential spaces. People instinctively hang art at their own eye level while standing, which is fine for a single piece, but when you repeat it across a gallery wall, every piece ends up too high and the arrangement floats above the room's furniture line.
Commit to the 57-inch center rule and you'll never have this problem.
Using Frames That Are All the Same Size
Uniform size reads as wallpaper. Your eye doesn't know where to land. At least one piece should be significantly larger than the rest, a hero piece that anchors the arrangement and gives the eye a starting point.
Ignoring the Wall Color Behind the Art
Your wall color is part of the composition. Warm off-white and cream walls add depth to both color and B&W prints. Dark walls (navy, forest green, charcoal) make prints pop dramatically but need high-contrast frames. Pure white walls are unforgiving. Every frame needs to earn its space.
Mixing Too Many Frame Materials
Black frames, gold frames, natural wood, white: all on the same wall. This usually reads as indecision rather than eclecticism. Pick one or two frame materials and stick to them. A mix of black and natural wood is cohesive. All four materials is not.
Spacing Frames Inconsistently
Random gaps are the visual equivalent of bad kerning. Your eye knows something is off even if you can't articulate what. Measure the gap between your first two frames, write that number down, and replicate it throughout the arrangement.
Step-by-Step: From Wall to Finished Gallery
Step 1: Measure your wall. Note the width and height of the area you're working with. Factor in any furniture below. You want the bottom edge of your arrangement to sit 8–10 inches above a sofa or console.
Step 2: Choose your prints. Apply the anchor-complement-contrast formula. Decide on a rough size ratio. For most walls, something like one large (A1 or A2), two medium (A3), and two or three small (A4) creates good hierarchy.
Step 3: Lay it out on the floor. Arrange all your prints in front of the wall. Step back. Photograph it from above. Live with the arrangement for a day if you're uncertain.
Step 4: Cut paper templates. Trace each frame onto kraft paper or newspaper and cut them out. Label each one. Tape the templates to the wall with painter's tape. This lets you adjust the layout without making any permanent marks.
Step 5: Mark your nail locations. Most frames have a hanging wire that sits a few inches below the top of the frame. Measure the distance from the top of the template to where the nail should go, then mark directly on the template before removing it.
Step 6: Hang your pieces. Start with the largest piece and work outward. Use a level on every frame, or use mounting strips with built-in leveling.
Step 7: Stand back and adjust. A print that looked right on the floor may not feel right on the wall. Small adjustments are normal. This is the stage where you fine-tune spacing and swap any piece that isn't working.
Browse the Noir Silhouette Collection
If you want a ready-made foundation for a gallery wall, the Noir Silhouette collection is an excellent starting point. The B&W palette and bold graphic style means every piece in the collection works alongside any other. You can pull three, four, or five prints and build a cohesive wall without second-guessing whether they belong together.
Final Thought
A gallery wall is a long-term investment in your space. Unlike a single piece of art that you hang and occasionally notice, a gallery wall changes the entire character of a room. Done well, it becomes the thing people comment on the moment they walk in.
The mechanics are learnable in an afternoon. The harder part is curation: choosing prints that have genuine tension and genuine harmony at the same time. Start with three prints, get those right, and add from there. A gallery wall that grows over time always looks more considered than one assembled in a single weekend.